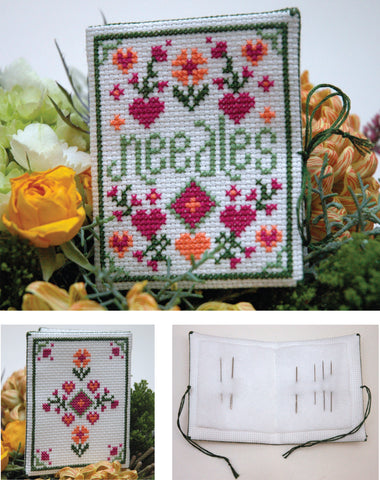
How to Make a Cross Stitch Needle Case
This cross stitch tutorial will show you how to make a simple and beautiful keepsake cross stitch needle book or needle case.
The finished dimensions of this needle case are 3″ x 4″ when using 14-count Aida cloth, but you can adjust the sizing up or down by changing the thread count or using a different fabric (linen, or another even weave, perhaps?).
Experiment and have fun with it!

Material List:
Your finished designs (you can find the needle book used in the tutorial here)
14-count Aida Cloth (or Linen, if you prefer)
Embroidery Needle
Embroidery Floss
Iron-on interfacing
Iron
Felt
Fabric Scissors or Pinking Shears
Stitching Instructions:
Step 1 - Complete all cross stitching on your needle case. You should have 2 finished pieces of aida cloth: 1 outside piece, and 1 inside piece. They should be exactly the same size.
Step 2 - Count 2 rows from the edges of your finished outside piece, and backstitch a border around the design. Stitch the same size backstitch border on the inside piece of your needle case. This creates your sewing edges for assembly.
Step 3 - Trim the Aida cloth around each piece, leaving approximately 1/2″ of fabric (on 14-count, this works out to 7 squares) from the backstitched sewing line on all sides.
Step 4 - Cut your interfacing to be exactly the same size as your backstitch lines. Using an iron, fuse the interfacing to the wrong side of your aida cloth on both pieces.

Step 5 - Trim off the corners.

Step 6 - Fold back the edges along the sewing line on all pieces, pressing down with your fingers.

Step 7 - Make a knot using 2 (two) strands of embroidery floss the same color as your backstitching line. Start sewing the outside and inside pieces together using a whip-stitch, as you would for a biscornu (not sure how to do this? Read the biscornu tutorial here). Do this by taking a stitch under one of the backstitched threads on the outside piece, then one on the inside piece, and so forth. Continue stitching until all 4 sides are stitched together. I take a few extra stitches at the corners, for stability. And it looks nice, too.

Step 8 - Cut a piece of felt to be slightly smaller than the needle case. I used regular scissors, but you can also use pinking shears to give the felt a nice edge.

Step 9 - Stitch along the centre of the felt, through all layers of fabric. You may choose to use a sewing machine for this step, or sew it by hand using a small straight stitch or backstitch. (I used white felt, and hand-sewed using a backstitch with white thread, so the stitching line would be less visible.)

Step 10 - Make the thread ties: Cut 2 lengths of 6-strand embroidery thread 10″ long. Fold one length in half, so there is a loop on one side and 2 thread ends on the other. Thread the ends through a large needle. Run the needle through all layers on the front edge of your needle case. Pull the 2 ends through the loop and pull tightly so it fits snugly on the side of the needle case. Tie a knot in the ends of the thread to keep the two loose ends together. Repeat with other 10″ length, attaching it to the back of the needle book. Once attached, these 2 strings can be tied in a little bow to keep the needle book closed.

OR, attach one thread tie on the back of your needle book, and sew a small button on the front edge. Wrap the tie around the button to close the needle book.

Congratulations! You now have a beautiful keepsake needle book!


