

How to Sew a Cross Stitch Pillow
This cross stitch tutorial will show you how to sew a fun and easy fabric pillow to showcase your finished cross stitch

Material List:
~Your finished cross stitch design (on Aida cloth, evenweave, linen etc.)
~Cotton Fabric (or any fabric of your choice- try corduroy, denim, twill, or any other woven fabric. I don’t recommend using stretchy or knit fabric, as it will be quite difficult to sew to your Aida cloth)
~Fabric Scissors
~Sewing Machine (Highly recommended. You can sew it all by hand, but it will take much longer!)
~Matching sewing thread (I used white)
~Straight Pins (optional, for pinning cotton to Aida cloth for sewing)
~Steam iron
~Hand sewing needle (only needed at the end)
Stitching Instructions:
Complete all cross stitching before assembling the pillow.
Step 1 - Choose your fabric. I tried to find a cotton that picked up the colors and shapes found in the cross stitch design. But feel free to use a solid fabric, or mix-up prints on the front and back. Be creative!

Step 2 - Cut down your Aida cloth to the size you want. You will need a 1/2″ for seam allowance on every side (7 stitches on 14-count Aida), so take that into account when trimming down your Aida cloth.
This one ended up being 6″ x 13″, including seam allowance (you should leave about 2-3″ of Aida cloth around your stitching at the very least)

Step 3 - Now let’s make the two pattern pieces. Either make them first on paper, cut out, and then trace onto your fabric. Or, you can draw this diagram right onto your fabric using the measurements given below. That’s what I did. Just make sure not to get pencil marks on any part of your fabric that will show on the pillow!
IMPORTANT TIP: Place two (2) layers of fabric together, lay your pattern pieces on top (or draw diagram lightly in pencil) and cut through both layers at once. This saves time ![]()
Make your (2) two pattern pieces like this:
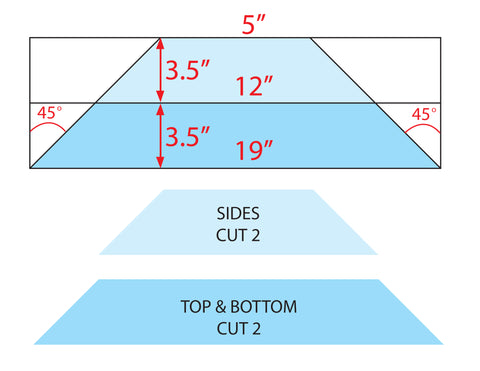
Step 4 - Cut (2) two SIDE pieces and (2) two TOP & BOTTOM pieces. You should now have (4) pieces of cotton fabric altogether.
Step 5 - With Right Sides (RS) together, line up the short edge of one of the Top fabric piece with the top edge of your stitching piece.
Using your sewing machine, stitch across the top with a straight stitch, backstitching at either end to secure your thread. Make sure to start and end 1/2″ from each edge, so there will be seam allowance on the angled sides. (see photo below)
IMPORTANT SEWING TIP: When stitching these seams on your machine, place the cotton fabric on the bottom and the Aida cloth on the top. It will be much easier to sew. If you try sewing with the lighter, stretchier cotton on top, you will end up stretching it out of shape, and it will be difficult to match the sewing edge to the Aida cloth.

Step 6 - Sew each of the remaining (3) three pieces onto your Aida cloth as in Step 5. It should now look like the photo below:

Step 7 - Join the angle (mitred) edges of cotton with Right Sides (RS) together. Begin stitching from the previous stitching line out to the outer edge of cotton.
A good trick is to slowly lower your needle into the hole of the first stitch of the previous stitching line. That makes sure there will be no gaps between stitching in the final pillow cover.

Step 8 - Snip the corners so they will lie flat. Don’t snip your stitches! Just cut close the stitching line, but not too close.
Step 9 - Press the seam allowances open using your steam iron.

Step 10 - You should now have completed the Top Pillow Piece. The hard part is over, good job!

Step 11 - Cut another piece of fabric exactly the same size as the top piece. No need to measure it out- just lay the Top Pillow Piece onto the cotton fabric and cut around it with fabric scissors. This is the Bottom Pillow Piece.
Step 12 - Place Top Pillow piece and Bottom Pillow Piece with RS together. Pin if you need to. Sew all around the edges with a 1/2″ seam allowance (1/2″ SA), leaving a 3-4″ hole in the bottom side.
Step 13 - Stuff the pillow with polyester stuffing. Easy.
Step 14 - Hand-stitch the opening closed using a small whipstitch.

That’s it! You’re all done. Now sit back and enjoy your handiwork.
